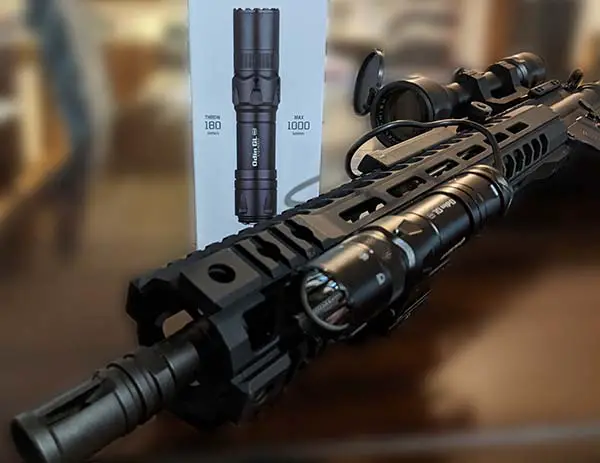
Great Odin’s beard! I got another advanced screening of the newest offering from OLIGHT. Today’s OLIGHT Odin GL Mini review features installation instructions, basic operation, battery life, pain points, and more for this rifle mounted flashlight.
Table of Contents
OLIGHT Odin GL Installation
When I first opened the OLIGHT Odin GL packaging I was concerned that the pieces might confuse some shooters. However, the installation is pretty straightforward and within a few minutes I was able to discern how almost everything worked. More importantly, I understand why OLIGHT designed the flashlight this way. Therefore, here’s a brief tutorial on how to fit the Odin GL Mini onto your rifle.
OLIGHT Rail Mount Adapter

The easiest piece to install was the OLIGHT Odin Mini rail adapter picture above. However, there are various slots, screws, and knobs that I’ve identified below. Please note the Odin GL Mini is designed for Picatinny rails ONLY, and the laser will not zero properly on M-Lok systems.
- Picatinny rail channel
- Locking knob
- Rail mounting screws
- Undermount flashlight channel
- Offset (side) mount flashlight channel
- Flashlight locking screws
Before installing the Odin Mini rail adapter, you need to loosen the rail mounting screws. Loosening these screws allows you to easily place the adapter on your rail system. Afterwards tighten the screws.
The orientation of the rail adapter is a matter of personal preference and does not affect performance. If the locking knob is on the right when viewing the rifle from the back, the light enters the flashlight mounting channels from the rear. Conversely, if the locking knob is on the left slide the light will be slid down the channels from the front.
Attaching The Odin GL Mini To The Rail Mount
Next, you need to attach the Odin GL Mini flashlight to the rail adapter. As mentioned above, simply slide the top bar of the light down the desired channel on the adapter until you hear a “click”. This is important, because the locking knob will not lock unless the light is properly seated.
Next, rotate the locking knob and until the arrow points to the locked icon. Afterwards, tighten the flashlight locking screws. Failure to adequately tighten the rail mounting screws, the flashlight locking screws, or the locking knob after placing the light will result in movement of the unit.
In order to remove the unit, you may need to loosen the flashlight locking screws. Additionally, rotate the locking knob to the unlocked position and press the knob inward to remove the flashlight.
Connecting The Odin GL Mini Activation Switch

First and foremost, I’d like to say mounting the switch for this OLIGHT Odin GL Mini review gave me the most problems. Therefore, I’m going to explain the easy way to mount the switch on your picatinny rail.
But first, I’m going to explain how to connect the remote to the flashlight. One end of the remote switch has a socket that fits over the magnetic tail of the flashlight. To install the remote ensure the detent ring is unlocked and in the downward position. After placing over the tail pull forward to lock the socket in place.
Next, you need to install the rubber switch bracket. Remove the actual switch from the rubber bracket by pulling up on the wired end. Afterwards, place the bracket in the appropriate place on your rail system. Next, replace the non-wired end into the bracket. Finally push down until the wire is seated in the notch at the front of the bracket.
Flashlight Operation & Settings
The settings for the Odin are setup exactly the same as the Baldr Pro R pistol flashlight. A ring at the front of the flashlight controls whether you are using the flashlight, the laser, or a combination of both.
Lightly pressing the back button of the flashlight, or “lo” on the remote switch, turns on the light at low lumen output. Similarly, firmly pressing the back button on the flashlight or “hi” on the remote switch turns on the high lumen output. Additionally, if you press and hold the button/switch, you can shut off the light by letting go in either configuration.
Unfortunately, there is no strobe feature on the OLIGHT Odin GL Mini.
How To Zero The OLIGHT Odin GL Laser
Unfortunately, the instruction pamphlet does not cover how to zero the laser on the OLIGHT Odin GL Mini. However, I’m very familiar with other OLIGHT setups, so it was easy to deduce. Behind the settings adjustment knob there are two small screws that control windage and elevation of the laser.
As I am writing this sentence, I’m second guessing myself. However, I’m fairly certain that the screw adjustment follows the same pattern as the Baldr Pro.
Odin GL Mini Review: Battery Life and Charging
When it comes to the battery life of the Odin GL Mini flashlight and laser, the run times are pretty spot on compared to the tech specs sheet. Regardless of whether you run the laser or not, the high lumen output fails around 70 minutes into continued use. Similarly, the low lumen output setting will function for about 3.5 hours of sustained use with or without the laser.
Similar to other OLIGHT models, the Odin GL Mini uses the magnetic charging cable. Additionally, the light has a tiered power band similar to other OLIGHT models. The tiers are 100% to 50% to 20% when using the high lumen output.
Furthermore, the unit has a built in alert system when battery power gets low. Under 20% battery the unit will vibrate every 5 minutes, and when there is less than 5% battery it will vibrate every 10 seconds. Ultimately the unit will shut off or cease to turn on.
If you plan to use the high lumen setting, the unit can get hot quickly. After 10 minutes of sustained usage, the body of the flashlight was very warm to the touch. According to the documentation, the light can reach 50 degrees C (122 degrees Fahrenheit) in high lumen mode.
Another quirk of the OLIGHT Odin GL was the charge time which took 2.5 hours from completely dead to fully charged. Additionally, because the unit uses a rechargeable battery you cannot just swap in a new battery on the fly.
OLIGHT Odin GL Mini Tech Specs

If you’re wondering about the profile of this little gem, the OLIGHT Odin GL Mini flashlight measures 5 inches. However, the activation switch measures 12 inches from the magnetic detent ring to the back of the remote when fully extended.
Amazingly, the flashlight weighs in at just under 5.3 oz. However, if you add the weight of the activation switch the weight is just below 7.4 oz. Finally, the rail mount adds another 1.4 oz. Therefore, the total weight of the OLIGHT Odin GL unit is 8.8 oz. or just over half a pound.
Beam Spread

Unlike pistol flashlights, a rifle mounted light needs to perform at distance. However, capturing the beam spread at 25 yards is no small feat. Therefore, I measured the beam spread at the similar intervals to my pistol flashlights. Above is a picture of me (6 ft) at 15 yards using the high power output light for reference. You’ll notice that the beam throw is slightly wider than that of the Baldr S.
Distance
5 yds.
10 yds.
Inner Beam Diameter (Hi Lumen)
~52 in.
~96 in.
What I Would Change on The Odin GL Mini
Although the Odin GL from OLIGHT is an affordable flashlight and laser solution for your rifle, there is definitely room for improvement. First, I think the switch should be more robust and provide the ability to toggle between flashlight intensity and laser operation. Breaking my grip to modify settings seems counter productive.
Additionally, the switch mount is rubber and could probably be swapped out for something more durable. Furthermore, the installation was not intuitive and appeared to be one piece. However, I’m hoping the OLIGHT Odin GL installation guide above has helped some people out.
What I Like About the Odin GL Mini
Being able to handle the OLIGHT Odin GL Mini as a regular flashlight is a cool feature. However, operating the magnetic push button on the back was not initially apparent. Lightly press the button to turn on the light in low lumen output. Press completely to turn on high lumen output.
Easily disconnecting the switch from the flashlight means you won’t be without lighting should the switch break. Therefore, not being hardwired is a good fallback. Additionally, you can replace one component rather than having to send the light back to the manufacturer in the event of a failure.
Parting Shots
As I previously mentioned, I’m generally more concerned with pistols and accessories instead of rifles. However, if you’re looking for a good quality and affordable rifle light solution then the Odin has you covered. If you found the OLIGHT Odin GL Mini review helpful then please leave a comment or consider clicking the affiliate link below to support the site!


