Thanks to the folks at OLIGHT, I got pre-sale access to the OLIGHT Baldr S to run it through the gauntlet. I tested durability, beam spread, laser operation and more. I’m providing you with all the tech specs and test results in this OLIGHT Baldr flashlight review so you can decide if the Baldr S is right for your gun.
Fitting The OLIGHT On Your Pistol
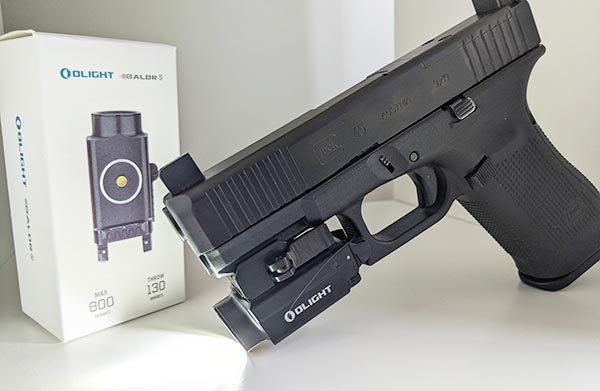
If you own a Glock, you’ll be happy to know that the Glock adapter is the standard for when the Baldr S ships. However, if you don’t own a Glock you needn’t worry. There is an adapter for standard Picatinny rails included with the OLIGHT.
Once you get the correct adapter on the unit, simply move the locking arm forward to loosen the grooves that lock onto the rail. Slide the unit onto your rail and then lock the arm again. If you’re having trouble sliding the light onto your gun you can press the locking arm to make it easier to slide the light into place.
Light Profile Adjustment

Unlike the Mini Valkyrie, there are a few more ways to customize the fit of this flashlight onto your pistol. First, the locking arm connects to a bracket which can be moved forward or backward. While this option seems innocuous it allows you to position the switches of the light in a location that best works with your grip. However, it comes out of the box in a more forward position.
BALDR S Lumen Output & Beam Spread
During the course of testing (and reading) the information for the OLIGHT Baldr S Flashlight review, I found this flashlight can operate at low and high outputs. Thus, the low output of the flashlight is 100 lumens, while the high output is 800 lumens on the Baldr S Flashlight.

Above is a picture of the low vs. high output at 10 yards. Below, I’ve outlined the results from my testing below using my standard distances. It’s worth noting that the beam diameter didn’t really vary too much between low and high output modes.
Distance
3 yards
5 yards
7 yards
10 yards
Inner Beam Diameter
28 in.
48 in.
58 in.
72 in.
Is The Baldr S Laser Good?
If I had to say what my biggest concern is, I think the laser on the Baldr S is probably it. However, I’m more of an optic or iron-sights kind of shooter anyways so it wasn’t a huge deal for me. Additionally, the laser wasn’t bad by any stretch of the imagination and when compared to something like the Tacticon Armament it’s vastly superior. Honestly, I probably had unrealistic expectations.
Where the laser shines (no pun intended) was in moderate to low light scenarios. Under any conditions other than direct sunlight, I was able to make the green laser out on any surface. However, I will admit it was clearer on non-textured surfaces as opposed to things like light colored brick. I could make out the dot on a wall outside of 45 feet.
Unfortunately, when I tried to use the laser in direct sunlight I couldn’t even see the dot at longer distances. Instead I had to place on the ground and focus on follow it up toward the target to actually see it. Inside of 5 yards you’ll be fine in high light conditions. Things start getting “iffy” once you stretch that out to 7-10 yards. For this reason the laser is best used at indoor ranges and consequently for home defense.
Is The OLIGHT Baldr S Easy To Operate?
From the moment I opened the box to having the light installed on my gun, it took about 5 minutes. I had to tighten up a few set screws to make sure everything was locked in and then I was on my way.
From a usability perspective, any shooter whether novice or experienced is going to be able to operate this flashlight once it’s installed. Turning the flashlight on and off is a very intuitive, but toggling between settings is something you’ll need to be familiar with to operate. Additionally, you can maintain pressure on the switch to keep the light/laser on and release to turn it off for pressure sensitive operation.
Furthermore, if you want the high visibility white light setting you need to first turn on the flashlight. Next, you need to double-tap the on switch which should increase the brightness dramatically.
Switching Between Settings

Because you may not always want both the flashlight and laser combo working in tandem, there is a selector switch on the bottom of the unit. Although it is easy enough to change the setting, doing so on the fly will require memorization. Moving the switch toggles between the 3 settings; light only, laser only, and light + laser.
Although it isn’t a huge deal, I think I would have preferred a different location for the switch. Of course this is personal preference. However, it’s worth noting that you can seamlessly toggle the settings even while the unit is on.
As I mentioned above, how to turn on the high brightness of the flashlight is not a select-able option on the toggle switch. Instead operator input (double-tapping the on switch) dictates which brightness setting is used.
How to Zero The Laser: Windage And Elevation

It took me about 50 rounds of ammunition to zero the laser on the Baldr S at 10 yards (30 feet) for the purposes of this review. I could have done it with significantly less if I understood how the adjustment screws worked.
In my mind, when my shots missed high I needed the laser to move down. However, instead I needed to adjust the screw toward the “U” direction. After several failed attempts and some head scratching I looked through the irons to try and reconcile the difference in shot placement. Surprise, I’d been moving the laser in the wrong direction. The same was true for windage.
After zeroing the laser, I mounted it on my new Springfield to see how things looked. No big surprise the laser needed to be re-zeroed. Thus, you’ll need to zero the laser for the exact pistol you intend to keep it on.
Battery & Charging Details
True to form, the OLIGHT Baldr S uses the same type of rechargable battery as their other flashlights. I was able to charge the unit with the older charger I had for my Mini Valkyrie. I didn’t measure the charge time — because I did it so many times — but I’d say it’s about an hour from completely dead to full charge.
Battery Run Time: Light, Laser, & Both

I thought it would be important, for the purpose of the OLIGHT Baldr S flashlight review, to measure the battery run time for all of the available modes. I’m glad I did, because the battery run time can vary greatly based on your settings. Below is a list of the recorded times from a full charge:
Setting
LOW Light ONLY
Laser ONLY
LOW Light + Laser
HIGH Light ONLY
HIGH Light + Laser
Runtime
130 min.
5+ hours
120 min.
40 min.
40 min.
Another cool feature of this light is the “low battery” indicator. This is great for a quick check of the battery capacity if you leave your pistol inside a nightstand or dresser for home security. Periodically turn on the light to check the indicator and see if your flashlight needs a charge.
Weight Distribution
The increase in weight of the Baldr S over the Mini Valkyrie is minimal. The additional weight did not make a difference to me when aiming down the sights, but I’ll let you decide if it works for you. Using a food scale, the OLIGHT Baldr S weighs in at 3.3 oz and is about an ounce heavier than the Valkyrie — which is negligible from my perspective. Given that you get a green laser in addition to a flashlight the trade-off in weight seem nominal.
OLIGHT Baldr S Durability Testing
Once I zeroed the laser, it was time to do some durability testing for the OLIGHT Baldr S review. Because I was testing in the middle of the woods, the best I could do for the drop test was throw the flashlight against a tree. You can see more in the video review.
My initial volley seemed to indicate that the laser got out of zero — but I’m fairly certain that was shooter error and a dependency on the laser to override poor technique. However, my second set of test shots, where I focused on my fundamentals yielded a different result indicating that the Baldr S did in fact hold zero fine.
Additionally, there didn’t seem to be any cracks in the glass on the flashlight after doing the “drop” testing. Furthermore, there were only a few minor scuffs after bouncing around the forest a few times.
Is The OLIGHT Baldr S Budget Friendly?
While the Baldr S is a bit more costly than some of the other offerings from OLIGHT, I’d still consider it a budget friendly option. After all, you’re looking at spending about $100 more on flashlights from Streamlight that have comparable specs. I’ve been impressed with each offering from OLIGHT I’ve had the opportunity to test.
Parting Shots
If I had to categorize the OLIGHT Baldr S, I would say it’s a beefed up version of the Mini Valkyrie. After all, it has adjustable positioning, a built in laser, and a more powerful flashlight. Additionally, you get all these features and only sacrifice a few ounces of weight which is negligible for most shooters. As far as budget flashlight options go, I think this is a wise investment.
Even if you opt for a different model flashlight or laser can save 10% at the OLIGHT storefront using the coupon code EDCC10 to save a few extra dollars.
Hopefully you’ve found my OLIGHT Baldr flashlight review helpful and I’ve answered all your questions. Please like, share, and do all the things if you found this content helpful. Also, please remember your purchases help support the site and help me get exclusive coupon codes like the one above.


