Ok boys and girls, today we are talking all things PK380. Today, I’m going to cover how to field strip your Walther PK380 using the factory tools. Afterwards, I’ll discuss alternate methods to disassemble your PK380 for cleaning. Finally, I’ll talk alternatives to all those pesky problem parts (I’m looking at your recoil spring)! But first, here’s the basics of field stripping your PK380:
- Clear your PK380 and enable the manual safety
- Use the take down tool from Walther to lower the take down clip
- Move the slide forward and separate from the frame
- Remove the recoil spring and guide rod (use caution!)
- Remove the barrel from the slide
TL,DR: I’ll be adding a video in the near future. If it isn’t already below, please check back. Also, be sure to use the table of contents if you have specific questions about the PK380 disassembly.
Table of Contents
1. How To Clear Your Walther PK380
The Walther PK380 has a few subtleties when it comes to clearing the weapon. However, you can use the traditional method of removing the magazine, racking the slide back, and visually inspecting the barrel. Below I’ll talk about the first step in the field strip process, and how the PK380 is unique.
Engage The Manual Safety
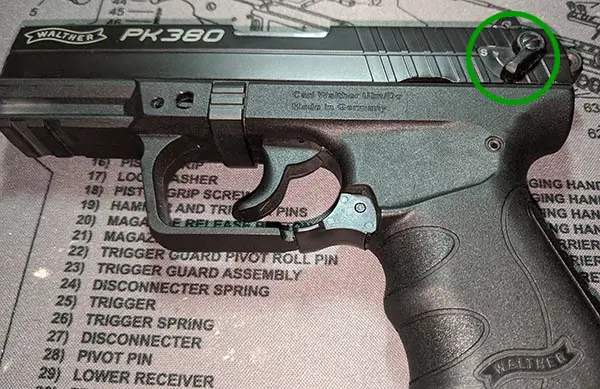
Before you go messing with your gun, it’s a good idea to engage any manual safeties. Sometimes, this is not possible (e.g. on a 1911) which impedes the operation of the slide. However, on the Walther PK380, the safety does not interfere with the operation of the gun and should be used. Pictured above, the weapon is on safe. Ensure the switch covers the “F” to put the PK380 on safe.
Walther PK380 Magazine Release
Before attempting to disassemble your PK380, you first need to ensure the weapon is clear. While this gun has a loaded chamber indicator, it’s always wise to clear the weapon in the traditional manner. First, drop the magazine by pressing the mag release lever (shown above). Unlike many weapons the PK380 has a lever that sits at the back of the trigger guard you must flip downward to eject the magazine.
Ejecting A Round & Inspecting The Chamber
Next, pull the slide back to eject any round that is in the chamber. You should always visually inspect the round, in case the force used on the slide is insufficient to eject the round. If there is a round in the gun you can gently shake the gun with the action open to unseat the round. Ensure the muzzle is tilted upward to help dislodge the cartridge.
Locking The Slide
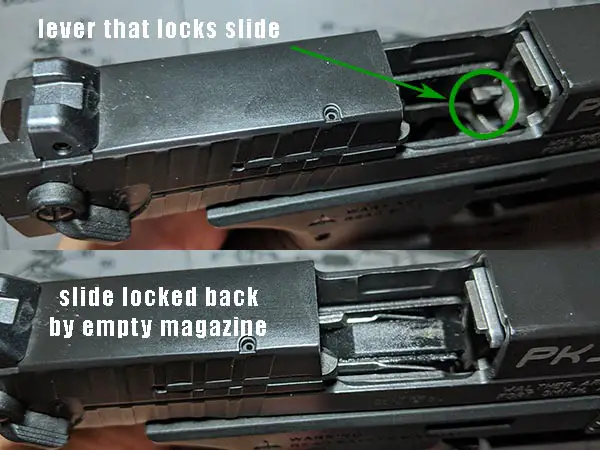
Generally, handguns allow you to lock the slide with the action open. However, the PK380 is a little different. If you want to lock the slide backward, you need to insert an empty magazine into the handgun and pull the slide back.
The reason for this, is a small bar/lever that is engaged by the magazine just to the side of the feed ramp on the barrel (shown above). You could engage this manually, but I don’t recommend it since you’ll need to hold the slide back while your finger pulls up on the small bar. Locking the slide back is not necessary to clear the weapon, and the slide should remain in the forward position during a field strip. But, I figured I would include it for informational purposes.
2. Using The Take Down Tool
The PK380 is unique to other handgun models offered by Walther. In order to field strip the PK380, you need the help of a tool. Below I outline the process for using this tool during a field strip, and options for a replacement take down tool.
Stock and Replacement Take Down Tool For PK380
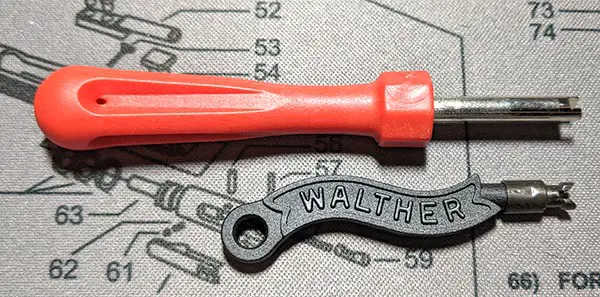
Pictured above is the take down tool provided by Walther, along with a replacement tool. In order to drop the take down clip, you’ll need the takedown tool. If you misplaced, lost, or otherwise need a replacement disassembly down tool for the PK380, this Valve Core Remover Tire Repair Tool (on Amazon) fits the gun. Additionally, you’ll get two versions of the tool. However, I will admit the single head version is much easier, the other is relegated to my range bag for emergencies.
Inserting The Take Down Tool
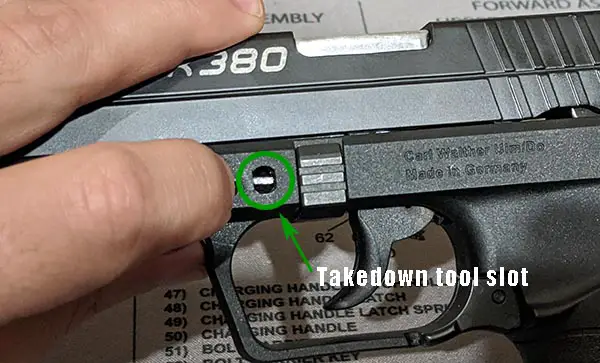
Next, insert your take down tool into the slot just above the trigger and in front of the take down clip (shown above). The slot is not ambidextrous and will be on the left side of the gun. Ensure that the hammer is in the forward position before continuing. Failure to do so will mean the slide will not come off the rails.
Afterwards, firmly seat the tool and rotate the tool counter-clockwise. If you are using the stock take down tool, you won’t be able to remove from the disassembly tool from the frame. However, the replacement tool can be removed easily and allows you to better manipulate the frame moving forward.
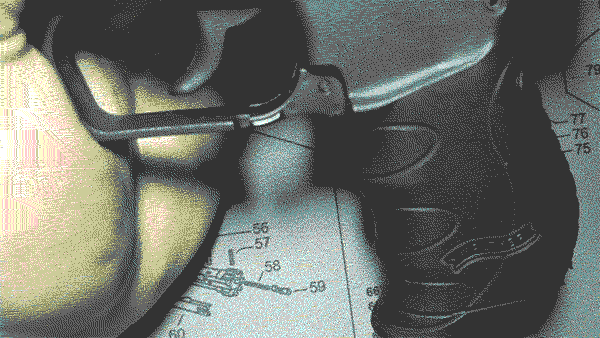
3. Take Down Clip Operation & Slide Removal
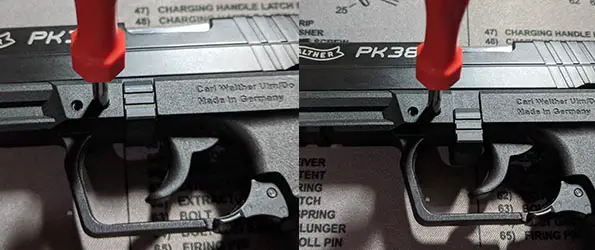
After rotating the take down tool, you will likely need to physically pull down on the take down clip. Pictured above are the clip in both the up and down positions. When performing a field strip, this clip does not separate from the frame.
Upon lowering the take down clip, the slide will want to move forward. Allow the slide to move forward along the rails and continue until the slide is separated from the frame.
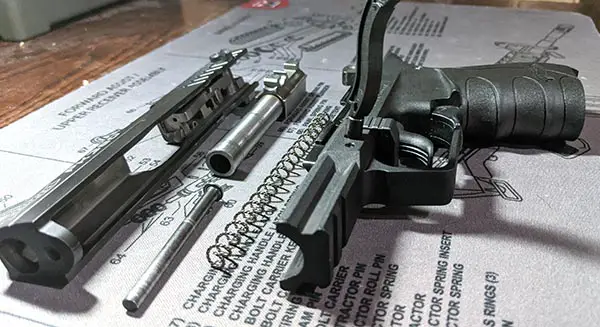
4. Removing The Guide Rod and Recoil Spring – CAUTION!
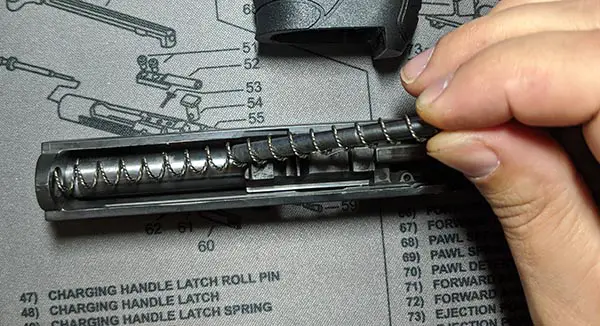
Use EXTREME caution during the next step. After separating the slide and frame, you can remove the guide rod and recoil spring. Gently compress the back end of the guide rod, and lift up slightly while keeping pressure on rod.
The guide rod and recoil spring are NOT one assembly as with some guns (e.g. Sig P250). Failure to keep pressure on the guide rod could result in the spring rapidly expanding and launching your guide rod into the nearest floor vent.
5. Removing The Walther PK380 Barrel
You’re almost done field stripping the PK380. Finally, remove the barrel from the slide by gently lifting up and moving the barrel toward the rear of the slide. Congratulations, you just finished the field strip and are ready to clean your gun. Additional disassembly is not recommended by the manufacturer. Any steps beyond those listed are best done by a gun smith or experienced firearm owner.
Re-assembling Your Walther PK380
So, you finally finished the field strip and cleaning of your PK380. Now, it’s time to put the handgun back together again. Essentially, the steps are performed in the reverse order. Although, as I’m sure you’re aware, this can be easier said than done. Therefore, to alleviate your stress when putting your gun back together, here’s some tips.
Re-Assembling The Recoil Spring And Guide Rod
:The biggest headache on the PK380 is the recoil spring. In Walthers’ infinite wisdom, they decided to keep the guide rod and recoil spring as two separate units. If your recoil spring is bending, binding, or otherwise being difficult to put back together, here are a few tips:
- Replace the guide rod and recoil spring for one unit
- Compress the spring on the guide rod then insert
- Use a cleaning rod to align the guide rod and spring then compress
Replacing The Guide Rod and Recoil Spring With Single Unit
If you’re fed up with fighting the recoil spring, then one solution is to pick up an integrated guide rod and recoil spring assembly from Galloway Precision. This is by far the easiest and best solution to your recoil spring problems! Instead of having to manually compress the spring and align the guide rod, the unit is self contained. No more guide rod flying across the room!
After field stripping my PK380 after each range session, I grew fatigued with this one step of the process. If you have a weak grip, large hands, or struggle with fine motor skills then this one replacement part is a godsend. I can’t explain how much easier it is to clean my Walther PK380 with just this one replacement part.
Compressing The Spring On The Guide Rod
Another option for re-assembling your gun, is to compress the recoil spring on the guide rod before attempting to re-insert it. Put the bottom of the guide rod against the table, and compress the spring pinching as you go. Once the top of the recoil spring is below the top of the guide rod you can attempt to pick up both. If you have the finger and grip strength this is an alternative to replacing the spring and rod. However, if you lack grip strength it’s likely the guide rod will go flying.
Using A Cleaning Rod To Compress PK380 Spring
Yet another option involves using a cleaning rod. First, insert the cleaning rod into the front of the slide where the guide rod will rest. Next, place the recoil spring around the cleaning rod. Finally, insert the guide rod at the rear of the spring and compress.
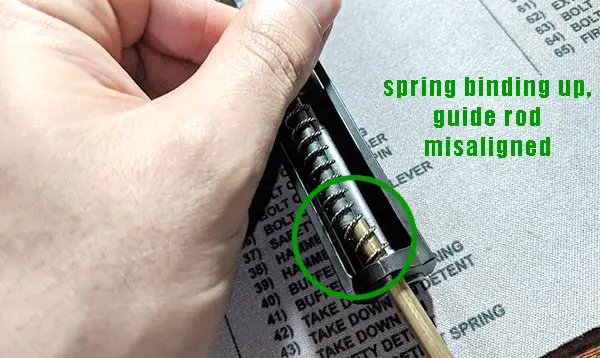
Perhaps I’m not smart enough, but I found this method almost as taxing as the previous method. However, apparently this method is recommended for those with weak grips as an alternative. Personally, I think they are better off with the replacement assembly.
The problem I had, was as the tip of the cleaning rod reaches the muzzle end of the slide, the spring will bow and the guide rod will dip. You can see the misalignment of the guide rod in the above picture.
Parting Shots
There you have it folks. A comprehensive guide on how to field strip a Walther PK380. Hopefully this answered any questions you have about disassembling your PK380. Additionally, you’re equipped with the knowledge for how to fix that irritating spring. If you enjoyed this article and still need a holster, check out my picks for the best Walther PK380 holsters. Finally, if you have more questions or found the content helpful, please leave a comment below it helps me a ton.
Recommended Tools:


