Glocks are one of the easiest firearms to disassemble, and today I’m going to show you how to take apart a Glock. I am using my Glock 45 for the purposes of demonstration but the process is similar for other Glock Gen 5 Models. First, I’ll outline the steps to field strip your Glock for cleaning. Next, I’ll disassemble the slide into it’s various components. Finally, I will take apart the lower assembly.
All of the steps are listed below, and I outline them in greater detail in later sections. But, I’ve also included this video that illustrates the simplicity of the process for any visual learners.
- Field Strip Glock For Basic Cleaning
- Unload the firearm by ejecting the magazine then verifying the chamber is empty.
- Ensure the firing pin is disengaged by pulling the trigger.
- Pull back slightly on the slide and pull down on the slide lock.
- Allow the slide to travel forward until the slide assembly separates from the frame.
- Remove the captured guide rod and recoil spring.
- Remove the barrel from the slide.
- Take Apart A Glock Slide
- Push the firing pin toward the rear of the slide.
- Depress the spacer sleeve with Glock takedown tool.
- While maintaining pressure on the spacer sleeve, remove the slide cover plate.
- Slide the firing pin assembly out.
- Remove the extractor plunger assembly.
- Depress the firing pin safety to release the extractor.
- Remove the firing pin safety and spring.
- Disassemble Glock Lower
- Use the Glock takedown tool to remove the trigger pin.
- Remove the locking block.
- Lift up to remove the slide stop assembly.
- Press out the trigger housing pin with the Glock takedown tool.
- Remove the entire trigger assembly from the frame.
Table of Contents
Beginners Guide: How To Field Strip A Glock
Before you are able to take apart a Glock completely, you first need to field strip the firearm. The manufacturer suggests that disassembling a Glock into the slide, barrel, recoil spring, and frame are sufficient for general maintenance. Therefore, lets discuss the steps to take apart a Glock for cleaning.
First and foremost, ammunition should NEVER be present when taking apart a firearm for cleaning. Therefore, you need to ensure your handgun is unloaded before proceeding. With the firearm pointed in a safe direction, press the magazine release button and set the magazine aside. Next, pull the slide rearward and engage the slide lock. Visually inspect the chamber to ensure it is empty.
Now that you have verified the handgun is empty, you can begin to field strip. First, lower the slide lock to allow the slide to travel forward. Next, point the firearm in a safe direction and press the trigger.
Do You Have To Pull The Trigger to Disassemble A Glock?
Contrary to the opinion of others, you must pull the trigger on a Glock in order to take it apart. Assuming you have properly verified the firearm is unloaded, the striker will be engaged. Although you can manipulate the slide lock while the striker is engaged, the slide will not separate from the frame. Because Glocks do not have a decocker the only way to disengage the striker is by pulling the trigger.
However, there is no need to maintain pressure on the trigger while taking the Glock apart.
Step 1: Unload Your Glock

Before you begin taking your Glock apart, ensure that magazine is ejected and the chamber is empty. Set the magazine aside to ensure, ideally in another room, prior to field stripping your Glock. Ensure you visually inspect the chamber with the slide stop engaged prior to continuing!
Step’s 2 – 4: Separate The Slide From the Frame

After disengaging the striker, pull back slightly on the slide using the non-dominant hand to release pressure on the slide lock. Pictured above is the technique I use to release tension on the slide lock.
Simultaneously, pinch the slide lock with the index and thumb and apply downward pressure. Maintain pressure on the slide lock as you allow the slide to travel forward. If the slide returns to battery, the slide lock was not lowered sufficiently. Repeat these steps until the slide can moved forward exposing part of the trigger assembly.
Finally, continue moving the slide forward until the slide assembly separates from the frame. Additionally, use minimal force to overcome the friction points between the slide and frame.
Step 5: Remove Captured Guide Rod

Now that you have separated the slide, you can further take apart the Glock for cleaning. Begin by removing the captured guide rod and recoil spring. Compress the spring from the skinny end until you can lift that end of the spring free from the groove in the barrel. Pictured below is where to apply pressure.
Step 6: Remove Barrel From Slide

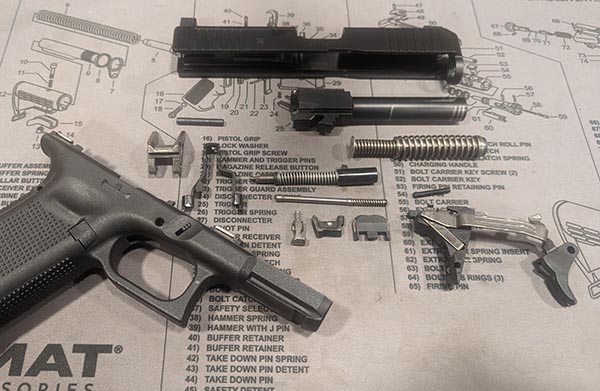
After removing the guide rod and recoil spring, slide the barrel forward. Next tilt the rear of the barrel upward and slide the barrel out of the slide. Once you have separated the captured guide rod from the slide, you should have 4 components on your work bench. Congratulations, this is sufficient for routine cleanings according the Glock. To learn how to take apart a Glock even further, read on.
How To Take Apart A Glock Slide
Before we continue on, I highly recommend getting the Real Avid Glock Takedown Tool. First, this tool allows you to perform all the necessary steps I have outlined to completely take your Glock apart. Second, it also comes with a tool to allow you to adjust the front sight on your Glock slide. Finally, it’s compact enough to be hooked onto your keychain — which is where mine resides. So without further ado, here are the steps to take apart your Glock slide.
Steps 7 – 8: Moving Firing Pin Assembly & Spacer Sleeve

First, push up (toward the read of the slide) on the protruding piece of the firing pin assembly. This is important because it creates the space between that portion of the firing pin, and the spacer sleeve. If there is no space between the pin and sleeve, you’ll hear an audible click when you push the pin up.
Sometimes during the field stripping process, the pin will already be in the rearward locked position. If this occurs, you’ll see a small gap between the sleeve and the pin.
Step 9: Remove Glock Cover Plate

Next, apply downward pressure on the spacer sleeve using the takedown tool to allow you to remove the slide cover plate. The illustration above shows the application of force to the slide cover plate and the spacer sleeve. Use caution as the firing pin assembly and extractor plunger are behind the cover plate. Both of these parts are under spring pressure and could eject rapidly if you aren’t careful.
Removing The Glock Slide Internal Components
Once you remove the cover plate, you have access to the internal parts of the Glock Slide. Here are the steps to take apart the Glock slide. You can use these images as a reference for part direction when putting your Glock back together.
Step 10 & 11: Firing Pin Assembly & Extractor Plunger

After removing the slide plate cover, all that remains is to remove the internal pieces of the slide. First, remove the firing pin assembly by guiding it toward the read of the slide. Next, pinch the end of the extractor plunger assembly and remove it as well. It’s worth noting that the extractor plunger assembly is installed with the metal end going into the slide first.
Step 12 – 13: Remove Extractor & Firing Pin Safety

After removing the firing pin and extractor plunger assemblies, press down on the firing pin safety and tilt the slide so the extractor simply falls out. Finally, rotate the slide so that the sights are upright and the firing pin safety will also fall out. Congratulations, you’ve now removed the internal pieces of the slide for your Glock. Pictured above are the labeled version of the slide parts.
How To Remove Parts From The Glock Lower
Now, lets move onto the Glock frame and how to take it apart. Unless you have a punch set, the Real Avid Takedown Tool is going to serve you well in disassembling the frame internals.
Step 14: Remove Trigger Pin

Before you can remove any internal components, you need to push out the trigger pin with your takedown tool. Personally, I push out all pins from the left side of the gun when held in first person perspective. Whichever way you end up doing things, I recommend always inserting and removing from the same side.
Step 15 – 16: Remove Locking Block and Slide Stop

After removing the trigger pin, you can use your takedown tool to pry up and remove the locking block. Because of the shape, this part is inserted at a 45 degree angle, so it’s best not to pry directly up.
Next, remove the slide stop by lifting it out of position. This piece should come out easily as the locking block is what holds it in place.
Step 17 – 18: Removing The Trigger Assembly
Once the trigger pin, locking block, and slide stop are taken apart, use your takedown tool to push out the trigger housing pin. This pin is located on the rear of handgun grip and parallel to the magazine release button.

Finally, lift the entire trigger assembly out of the frame. I lift the assembly out by the small metal arm protruding from the trigger mechanism housing. Ensure that you feed the actual trigger through the opening within the frame. Now you have a fully stripped down frame and slide, ripe for a good scrubbing!
Parting Shots
Now, before I get any push back from the community I fully understand that you can remove the slide lock and break down the trigger assembly. If you’re interested in seeing that content, leave a comment on my YouTube channel or on the site. Additionally, check out the field strip articles for similar content. Thanks for stopping by and share with your friends if you found this information helpful.


